Stall display
Crochet craft fair display: a six-foot table plan
A crochet craft fair table display needs to make three things easy: seeing the products, finding the prices and completing a purchase. Before buying another stand, mark out your actual table size and try those three tasks with the stock you intend to bring.
The layout below is an original planning example for a six-foot table, about 183 cm wide. It is a starting point for a trial setup, not a tested sales formula. Confirm the depth, space behind the table and all display rules with your organiser.
A crochet craft fair table display in three zones
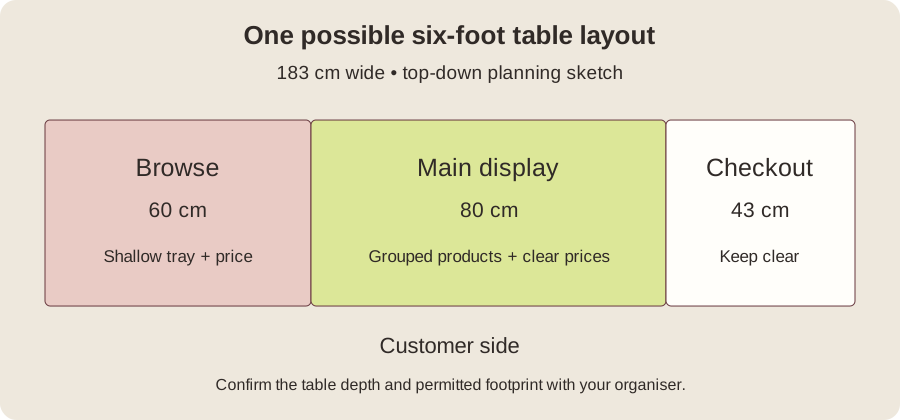
| Zone | Example width | Job |
|---|---|---|
| Browse | 60 cm / about 24 in | A shallow tray of easy-to-handle items with a nearby price |
| Main display | 80 cm / about 31 in | Your main product group, with clear spacing and a stable raised display if useful |
| Checkout | 43 cm / about 17 in | A clear place to set down, check and package a purchase |
The widths add to 183 cm; the inch values are rounded. No particular product belongs permanently on the left or right. Put checkout where you can reach packaging and payment equipment without turning away from the customer or blocking your own access.
Start with your footprint, not a shopping list
Tape the table outline on a surface at home. Include any space your organiser permits beside or behind it. A six-foot table listing does not necessarily include room for a freestanding rack, side table or floor sign.
Place the largest display pieces first, then add products and signs. If something hangs over the boundary, revise the layout. Keep bags, boxes and loose fabric away from the route you and visitors will use.
For outdoor events, use the organiser’s instructions for structures, weights and weather arrangements. This table plan does not specify safe anchoring or replace venue requirements. Add the equipment your particular event needs to the crochet market packing checklist.
Group the products so a visitor can understand them
Try grouping by use before grouping by colour. A tray labelled “Cotton face cloths” answers a question that a mixed basket of small crochet pieces does not. Put its price where a visitor can identify exactly what the number covers: one piece, a pair or a set.
Keep different sizes or differently priced versions distinguishable. If baskets are 18 and 26 in your local currency, place the two prices with their respective sizes. A sign saying “from 18” still leaves the shopper to work out the larger basket’s price.
A small range can make these groups easier to maintain. The guide to choosing first-market products helps you decide which pieces deserve display space before you make more of everything.
Use height only when it improves access
A raised sample can help a flat item be seen, but height is useful only if the setup remains stable and the products are reachable. Test the stand with the actual weight and shape of the items, not just an empty display.
Stand in front of the table, then view it from a seated position. Can you read the main price sign? Can someone lift an item without catching another product? Can you reach the payment area? Move any sign that hides the item it is meant to explain.
Avoid building a tall wall across the whole table. Leave an obvious place to speak with customers and hand over purchases. Do not stack extra crates simply because you own them.
Distinguish display stock from backup stock
Choose a display quantity by testing the layout. Keep the rest in labelled containers that you can open without dismantling the stall. For example, a group of six visible baskets plus four below the table is ten total baskets, not fourteen.
Keep a short refill note with each container, such as “Small baskets, sage, six total including display.” If someone helps you, agree whether the count means total stock or only the pieces in the box. The market inventory sheet records the total available stock; display-to-box movements do not change it.
If the table looks sparse, first try tighter product groups and clearer spacing. Making more stock to fill every inch can create work your event does not justify. Check any additional production in the free making-time planner.
Do a complete rehearsal before packing
- Time the setup. Start with packed containers, then assemble the display within your marked footprint.
- Read every price. Ask someone unfamiliar with the products what one item and one set cost.
- Simulate a purchase. Pick up an item, record it, take a pretend payment and package it.
- Refill a gap. Retrieve backup stock without placing boxes in a walkway.
- Pack down. Check that each stand and sign fits safely into the transport you have.
Take a front photo and a photo from behind the table. Save a short packing note beside them so you can recreate the arrangement when you arrive. If setup takes longer than the organiser allows, reduce the number of separate pieces.
Questions about small crochet stalls
Do I need expensive display equipment?
No particular purchase is required by this layout. Trial suitable equipment you already have and buy only to solve an observed problem, such as an unreadable sign or an item that will not stay upright.
Can I use the same plan on a smaller table?
Keep the three jobs but reduce the number of products on display. Do not shrink checkout to zero or push stock outside your assigned space. Measure a fresh layout for the smaller table.
Where should the newsletter sign go?
Place an optional sign where it does not hide prices or crowd payment equipment. State what people will receive. A purchase or conversation does not by itself give permission to add someone to an email list.
Should I rearrange the table during the event?
Fix clear access or visibility problems straight away. For other changes, note what you moved and when. That gives you a useful record instead of assuming a later sale proves the new layout caused it.